Measurements in Physics
Laboratory Exploration
Purpose:
· To introduce scientific measuring instruments.
· To practice measuring accurately with these instruments.
· To achieve mastery in reporting measurements to the correct number of significant digits based on the precision of the instruments.
Materials:
· Measurement kit containing: Vernier caliper, micrometer, depth gauge, metric ruler, aluminum square, plastic vial, graduated cylinder, steel ball.
Procedure:
Inner and outer diameters (a.k.a. internal and external diameters)
1. Measure the outer diameter of the plastic graduated cylinder.
1.1 Place the plastic graduated cylinder on the lab table. Hold the cylinder with one hand.
1.2 Using the ruler, measure the distance across the top of the cylinder. Record the distance from the outer edge of one side to the outer edge of the opposite side.
1.3 Record your measurement correctly in centimeters. Convert your centimeters into millimeters. Remember to record the correct number of significant figures.
1.4 Measure the outer diameter with the caliper. Using the ridged lines on the lower part of the Vernier caliper, open up the caliper all the way. Place the caliper over the outside edges of the cylinder.
1.5 Carefully slide the sliding scale of the caliper until the lower parallel sides of the caliper touch the cylinder. Observe where the last line on the moveable section of the caliper lies directly under another line. Record your measurement correctly in centimeters. Convert your centimeters into millimeters. Remember to record the correct number of significant figures.
2. Measure the inner diameter of the plastic graduated cylinder.
2.1 Place the graduated cylinder on the lab table. Hold it in one of your hands.
2.2 Using the ruler, measure the distance across the top of the cylinder from the inner edge of one side to the inner edge of the opposite side.
2.3 Record your measurement correctly in centimeters. Convert your centimeters into millimeters. Remember to record the correct number of significant figures.
2.4 Measure the inner diameter of the cylinder with the caliper. Invert the caliper so the upper part of the caliper is inserted into the inside of the cylinder. Place your thumb on the ridged section. Slowly move the caliper until the parallel parts for the internal measurement are touching the sides of the cylinder.
2.5 Carefully observe the inside bottom of the caliper to take your measurement in centimeters. Observe the last line of the bottom of the moveable part of the caliper to determine the internal measurement of the cylinder.
2.6 Convert your centimeters into millimeters. Remember to record the correct number of significant figures.
3. Calculating circumference and volume
3.1 Determine the circumference of the cylinder based on the outer diameter obtained from the ruler in centimeters.
3.2 Repeat the calculation using the diameter obtained from the caliper in centimeters. Record your answers in the correct number of significant figures.
3.3 Determine the depth of the cylinder using the depth gauge accessory on the caliper. Record your answer in centimeters using the correct number of significant figures.
3.4 Calculate the total volume of the cylinder in cubic centimeters using the measurements taken with the ruler and with the measurements taken with the caliper and depth gauge. Record your answer with the correct number of significant figures.
Length, Width, Area and Volume
4. Measure the length, width and height.
4.1 length
width
height
Obtain the aluminum square. Using the ruler, measure and record the length, width and height of the aluminum square. Record your answer in centimeters using the correct number of significant figures.
4.2 Calculate and record the area of the face of the aluminum square. Calculate and record the volume of the aluminum square. Record all data using the correct number of significant figures.
4.3 Measure and record the length, width and height measurements with the caliper. Calculate and record the area of the face of the aluminum square. Calculate and record the volume of the aluminum square. Record all data using the correct number of significant figures.
5. Obtain measurements with a micrometer.
5.1 Remove the micrometer from the measurement kit.
Your micrometer is a precise instrument and should never be over tightened. Place the handle of the cylinder in one hand, and with the other hand, hold the rounded bottom. Turn the revolving barrel counterclockwise. Observe the units of measurement on the rounded shaft. Turn the moveable barrel counterclockwise or clockwise until the 0 line is perfectly horizontal to the horizontal line. Note that one turn of the barrel represents one millimeter.
5.2 Carefully turn the micrometer in a counterclockwise direction until it is opened wider than the height of the aluminum square. Carefully slide the aluminum square into the micrometer. Turn the barrel clockwise until it is touches the aluminum square. Turn the knurled knob on the end of the micrometer one “click” to achieve the desired tightness for measurement – remember: do not over tighten. Record the height of the aluminum square with the correct number of significant figures.
5.3 Calculate the area of the face and volume of the square using the caliper length and width measurements and the micrometer height measurement. Record the area and volume using the correct number of significant figures.
Challenge (optional, as time allows):
6. Measure and record the volume of pulp required to manufacture a sheet of notebook paper. Record your measurements and calculations using the correct number of significant figures.
Analysis:
1. Compare and contrast accuracy and precision. Consider how one could improve the accuracy of a measurement? the precision of a measurement?
The accuracy of a measurement depends on the skill of the person using the instrument. By learning how to properly use an instrument and by measuring an object more than once to see if the observation is the same, one could improve the accuracy of a measurement. The precision of a measurement depends on the instrument itself. This could be improved by using a newer instrument, or by using one with less wear. Precision could also be improved by using an instrument that allows the measurement of more significant figures.
2. Compare the number of significant figures in the calculations and measurements taken with the ruler to the measurements taken with the caliper and micrometer. Discuss the differences in precision of these instruments.
The ruler allowed the measurement of two significant figures, which gave the lowest amount of precision out of the available instruments. The caliper allowed the measurement of three significant figures, and the micrometer allowed four. This means that the caliper allowed more precision than the ruler, but not as much as the micrometer. The more significant figures that can be measured, the more precise the instrument is, so the micrometer is the most precise.
3. Compare your measurements and calculations with those of a classmate. Are they the same? Discuss sources of error in the accuracy of the measurements.
My measurements are similar to those of my classmates, but not exactly the same. Sources for error include the skills of the person taking the measurements of an object (if he or she knows how to use an instrument), problems with eyesight, simple mistakes in relaying a measurement vocally, or even rushing. Human error is quite common, so having high accuracy is difficult. Also, measurements may be different because of discrepancies in object size; for example, some of our aluminum differed in width, height, and length.
4. Which instrument is more precise, the metric ruler, micrometer or caliper?
The micrometer is the most precise instrument that we were able to use during this lab. It allowed us to record the highest number of significant figures, so the measurements were more precise than those using the metric ruler or caliper, which gave two or three significant figures, respectively. The micrometer allowed the precision of four significant figures.
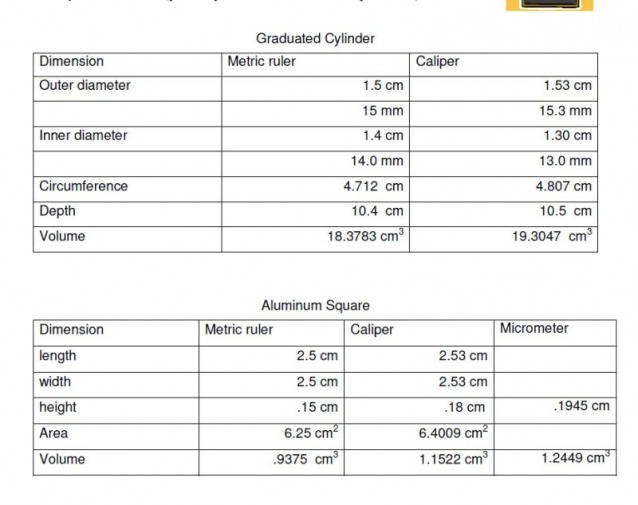
Sample Data Table (you may use this one or create your own):
Laboratory Exploration
Purpose:
· To introduce scientific measuring instruments.
· To practice measuring accurately with these instruments.
· To achieve mastery in reporting measurements to the correct number of significant digits based on the precision of the instruments.
Materials:
· Measurement kit containing: Vernier caliper, micrometer, depth gauge, metric ruler, aluminum square, plastic vial, graduated cylinder, steel ball.
Procedure:
Inner and outer diameters (a.k.a. internal and external diameters)
1. Measure the outer diameter of the plastic graduated cylinder.
1.1 Place the plastic graduated cylinder on the lab table. Hold the cylinder with one hand.
1.2 Using the ruler, measure the distance across the top of the cylinder. Record the distance from the outer edge of one side to the outer edge of the opposite side.
1.3 Record your measurement correctly in centimeters. Convert your centimeters into millimeters. Remember to record the correct number of significant figures.
1.4 Measure the outer diameter with the caliper. Using the ridged lines on the lower part of the Vernier caliper, open up the caliper all the way. Place the caliper over the outside edges of the cylinder.
1.5 Carefully slide the sliding scale of the caliper until the lower parallel sides of the caliper touch the cylinder. Observe where the last line on the moveable section of the caliper lies directly under another line. Record your measurement correctly in centimeters. Convert your centimeters into millimeters. Remember to record the correct number of significant figures.
2. Measure the inner diameter of the plastic graduated cylinder.
2.1 Place the graduated cylinder on the lab table. Hold it in one of your hands.
2.2 Using the ruler, measure the distance across the top of the cylinder from the inner edge of one side to the inner edge of the opposite side.
2.3 Record your measurement correctly in centimeters. Convert your centimeters into millimeters. Remember to record the correct number of significant figures.
2.4 Measure the inner diameter of the cylinder with the caliper. Invert the caliper so the upper part of the caliper is inserted into the inside of the cylinder. Place your thumb on the ridged section. Slowly move the caliper until the parallel parts for the internal measurement are touching the sides of the cylinder.
2.5 Carefully observe the inside bottom of the caliper to take your measurement in centimeters. Observe the last line of the bottom of the moveable part of the caliper to determine the internal measurement of the cylinder.
2.6 Convert your centimeters into millimeters. Remember to record the correct number of significant figures.
3. Calculating circumference and volume
3.1 Determine the circumference of the cylinder based on the outer diameter obtained from the ruler in centimeters.
3.2 Repeat the calculation using the diameter obtained from the caliper in centimeters. Record your answers in the correct number of significant figures.
3.3 Determine the depth of the cylinder using the depth gauge accessory on the caliper. Record your answer in centimeters using the correct number of significant figures.
3.4 Calculate the total volume of the cylinder in cubic centimeters using the measurements taken with the ruler and with the measurements taken with the caliper and depth gauge. Record your answer with the correct number of significant figures.
Length, Width, Area and Volume
4. Measure the length, width and height.
4.1 length
width
height
Obtain the aluminum square. Using the ruler, measure and record the length, width and height of the aluminum square. Record your answer in centimeters using the correct number of significant figures.
4.2 Calculate and record the area of the face of the aluminum square. Calculate and record the volume of the aluminum square. Record all data using the correct number of significant figures.
4.3 Measure and record the length, width and height measurements with the caliper. Calculate and record the area of the face of the aluminum square. Calculate and record the volume of the aluminum square. Record all data using the correct number of significant figures.
5. Obtain measurements with a micrometer.
5.1 Remove the micrometer from the measurement kit.
Your micrometer is a precise instrument and should never be over tightened. Place the handle of the cylinder in one hand, and with the other hand, hold the rounded bottom. Turn the revolving barrel counterclockwise. Observe the units of measurement on the rounded shaft. Turn the moveable barrel counterclockwise or clockwise until the 0 line is perfectly horizontal to the horizontal line. Note that one turn of the barrel represents one millimeter.
5.2 Carefully turn the micrometer in a counterclockwise direction until it is opened wider than the height of the aluminum square. Carefully slide the aluminum square into the micrometer. Turn the barrel clockwise until it is touches the aluminum square. Turn the knurled knob on the end of the micrometer one “click” to achieve the desired tightness for measurement – remember: do not over tighten. Record the height of the aluminum square with the correct number of significant figures.
5.3 Calculate the area of the face and volume of the square using the caliper length and width measurements and the micrometer height measurement. Record the area and volume using the correct number of significant figures.
Challenge (optional, as time allows):
6. Measure and record the volume of pulp required to manufacture a sheet of notebook paper. Record your measurements and calculations using the correct number of significant figures.
Analysis:
1. Compare and contrast accuracy and precision. Consider how one could improve the accuracy of a measurement? the precision of a measurement?
The accuracy of a measurement depends on the skill of the person using the instrument. By learning how to properly use an instrument and by measuring an object more than once to see if the observation is the same, one could improve the accuracy of a measurement. The precision of a measurement depends on the instrument itself. This could be improved by using a newer instrument, or by using one with less wear. Precision could also be improved by using an instrument that allows the measurement of more significant figures.
2. Compare the number of significant figures in the calculations and measurements taken with the ruler to the measurements taken with the caliper and micrometer. Discuss the differences in precision of these instruments.
The ruler allowed the measurement of two significant figures, which gave the lowest amount of precision out of the available instruments. The caliper allowed the measurement of three significant figures, and the micrometer allowed four. This means that the caliper allowed more precision than the ruler, but not as much as the micrometer. The more significant figures that can be measured, the more precise the instrument is, so the micrometer is the most precise.
3. Compare your measurements and calculations with those of a classmate. Are they the same? Discuss sources of error in the accuracy of the measurements.
My measurements are similar to those of my classmates, but not exactly the same. Sources for error include the skills of the person taking the measurements of an object (if he or she knows how to use an instrument), problems with eyesight, simple mistakes in relaying a measurement vocally, or even rushing. Human error is quite common, so having high accuracy is difficult. Also, measurements may be different because of discrepancies in object size; for example, some of our aluminum differed in width, height, and length.
4. Which instrument is more precise, the metric ruler, micrometer or caliper?
The micrometer is the most precise instrument that we were able to use during this lab. It allowed us to record the highest number of significant figures, so the measurements were more precise than those using the metric ruler or caliper, which gave two or three significant figures, respectively. The micrometer allowed the precision of four significant figures.
Sample Data Table (you may use this one or create your own):